1 Comment

Newsletter 2.0: Issue 1

The Working Smarter Newsletter V2.0
By Bob "Dr. Mac" LeVitus
Issue 1  •  February 26, 2018

This is the first issue of the rebooted Working Smarter Newsletter, aka version 2.0. My goal is to provide you with useful tips, hints, and techniques you can use to work smarter, along with links to tips, hints, and techniques of others you might find beneficial. 

First up, a quick tip about the WiFi menu on your Mac:

The old Option key trick for your Mac's Wi-Fi menu

I heard this today on one of my favorite podcasts—MacGeekGab—and it reminded me that if I had forgotten about it, so (perhaps) have you.

So, here's the tip: Hold down the Option key before you click the Wi-Fi menu to see additional useful information regarding your connection and available networks.

Here's my Wi-Fi menu without the Option key:

And, here's my Wi-Fi menu with the Option key:

The most important bit of information (at least to me) is the MCS Index. While not a precise measure of network throughput, I've found that the higher the number, the better/faster the connection in that spot, at least for downloading or streaming media.

I did a few quick spot checks around my home and office and they seem to confirm my hypothesis: 

Before you write to tell me that neither the MCS index nor the Speedtest app are particularly accurate, save yourself the trouble—I know. The thing is, this tip gives you a handy, free way to get an idea of your current connection quality.     

•••••

Next up: An article I read on Fortune (dot) com last year about multitasking (and why it may not be good for you). I blogged about it last year, and it's still a winner. And, I still couldn't agree more. 

Here's a brief excerpt; click the headline to read the rest:

Here’s Why You Shouldn’t Multitask, According to an MIT Neuroscientist

by Earl Miller  

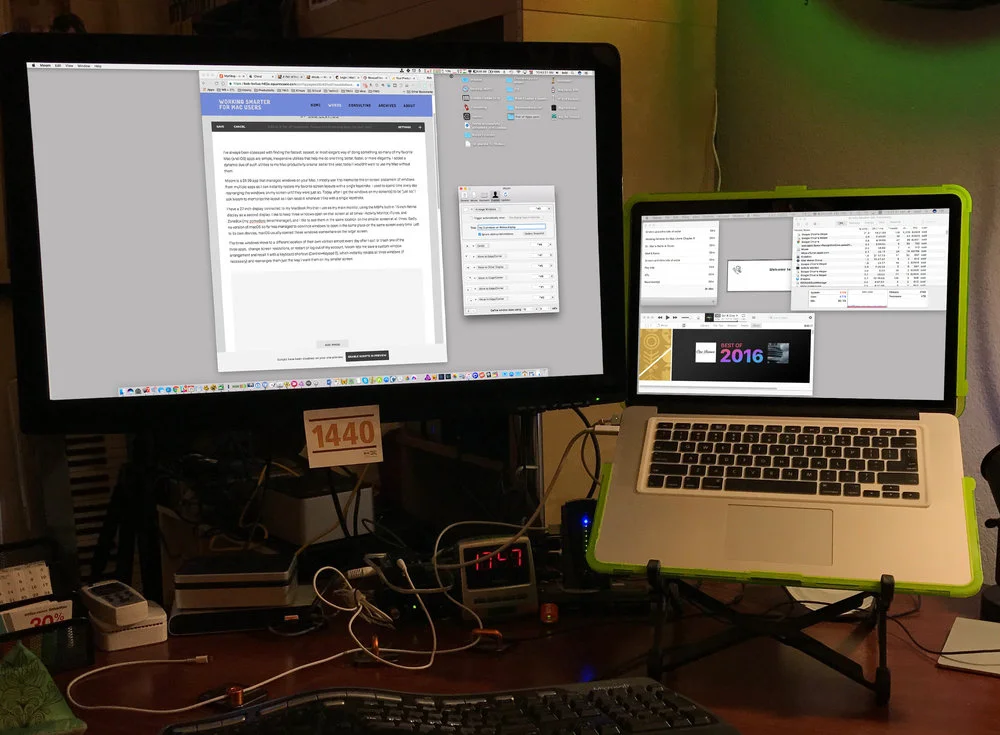
"Start by blocking out a period of time to focus. Eliminate as many distractions as possible: Put away your phone, turn off extra computer screens, shut down your email if you have to. Don’t try to mono-task by willpower alone; it’s too hard to fight the thirst for new information. Instead, prevent the urge by removing temptation. If you find yourself unable to concentrate, try taking a short break and move around. Increasing blood flow to your brain can help restore focus."

One of the cornerstones of Working Smarter for Mac Users is that you get more work done when you focus on one task at a time. I knew this instinctively, but only after years of trial and error, which is why I found the science that seems to prove it so fascinating.

Read Here’s Why You Shouldn’t Multitask, According to an MIT Neuroscientist

•••••

Moving right along… (with apologies to Monty Python)… And now for something completely different…

Setapp: Like Netflix for Mac apps

Ten bucks a month to "rent" a single app (I'm looking at you Photoshop and Word) really irks me, but I have no problem at all with Setapp, a service that charges ten bucks a month for access to more than 100 high-quality Mac apps 

I like it a lot, calling it, "Netflix for Mac Apps" in a recent Rants & Raves column for the Mac Observer.

Here's what my Setapp dashboard looks like:

And here's the Setapp detail screen for BeFocused, (an app I discuss enthusiastically in the new Working Smarter for Mac Users online course, by the way). 

Read my column at the Mac Observer.

Visit Setapp.com for additional information.

•••••

How to Focus and Concentrate Better (Lessons from a Lion Tamer) 

by James Clear

I read a lot of stuff about being more productive and improving my concentration, and James Clear is one of my favorite gurus writing on the topic. I love his stuff and find most of what he says inspiring. He doesn't send stuff often, but when he does, it's almost always good stuff.  

Read How to Focus and Concentrate Better (Lessons from a Lion Tamer).

and/or

Sign up for his newsletter (if you like his writing half as much as I do).

•••••

One last thing: 

I'm going to begin a Grand Opening promotion for the new 10-hour Working Smarter for Mac Users course this week, but I wanted you (my loyal newsletter readers and friends) to have an even better deal. 

The retail price of the course is $499; the Grand Opening deal I'll be promoting next week will be 50% off ($249).

The better deal for you, gentle reader, is this: 

Enroll by Monday, March 5 using coupon code reader75 at checkout to save 75% and pay just $124.75!

•••••

That's all, at least for now, but I'll be back. I'm going to try to send you something useful at least once a week, but I've learned my lesson, so that's not a promise. 

Have a great week. I'll talk to you soon.

All the best,


Bob "Dr. Mac" LeVitus
Creator of Working Smarter for Mac Users

P. S. Are you on my Insiders email list? If not, you're missing out.

You're gonna miss out on great tips, hints, techniques, reviews, recommendations and more.

I never clog your mailbox with garbage; if I send you an email, I guarantee it'll be good and handcrafted by me, just for you. 

There's no cost or obligation... the only reason I can think of not to try it would be... I can't even think of one. 

You're gonna love being an Insider — I guarantee it.

So if you're not an Insider, or you know someone who might enjoy and benefit from my occasional musings, here's a link to get all the delightful freebies and useful info you enjoy as an Insider:

Subscribe to Bob "Dr. Mac" LeVitus's Insiders List

1 Comment

Comment

Dr. Mac IS BACK!

I just sent the email below to literally everyone I know to bring them up to speed on what I've been up to, since I haven't posted here or sent out a newsletter in months.  

If you've ever signed up for one of my mailing lists, or were ever in any of my Contacts databases, you should have received the message (I'm Back!)  earlier this morning (February 19, 2018 at 10:39 AM Central as I type),

If you're not already on my email list, why the heck not? You'll receive all manner of free goodies, including (but not limited to):

  • tips
  • hints
  • advice
  • news
  • reviews
  • and more.

If you want all that and more, just click this big, honkin' button:  

Now, here's the aforementioned email: 

Dear Your_name_here,

I know it's been a while since last we spoke. I'm sorry. It's just that I've been busier than a one-armed wallpaper hanger with my latest project (more on that shortly) and haven't had time for much that wasn't mission critical. And, I'm sad to admit that personal correspondence and newsletters weren't mission critical. 

So I'm sending this message to everyone I know, every person on every list I have. So you, Your_name_here, are probably receiving it because you're: 

• a close personal friend

• a personal friend

• an acquaintance I've corresponded with recently  

• a business associate

• a family member

• a student or former student

or

• a subscriber to any of my lists over the years

If you're none of the above and have no idea who I am or why you got an email from me, I apologize for the intrusion. Please click the unsubscribe link at the bottom of this message and you won't hear from me again. Or, if you are one of the above but still don't ever want to hear from me again, please click the unsubscribe link. 

I'll be sad to see you go, but I'm launching a new chapter in my fledgling business (Working Smarter for Mac Users), and I only want you on my list(s) if you want to be on my list(s). 😜 

Moving right along, the thing that's kept me so busy for so many months is a brand new 10-hour course I wrote, produced, directed, and edited, called (of course) Working Smarter for Mac Users, based on my popular 2017 eBook of the same name. 

I couldn't be happier. It came out great and I know it is going to help many Mac users learn how to do more work in less time so they have more time for things they love. 

Enrollment starts tomorrow, so watch for the grand-opening announcement and special "friend-of-bob" pricing in your inbox (as soon as I confirm that everything works as well with real students as it did with my beta testers).

Have a fabulous week; I'll be in touch soon. 

Warm Regards,


Bob “Dr. Mac” LeVitus
Creator of Working Smarter for Mac Users
bob@workingsmarterformacusers.com

P. S. This also marks the return of my newsletter, with all the tips, techniques, and advice on becoming more productive you've come to know and love. I'll get the first one out as soon as I can, so please stay tuned. 

One Last Thing: If you don't want to miss any of my email messages accidentally, add me (or more precisely, my email address—bob@workingsmarterformacusers.com) to your Contacts database or white-list.  😎

Comment

2 Comments

I Wanted to Give This Course Away… But Mrs. LeVitus Won’t Let Me!

I Wanted to Give This Course Away… But Mrs. LeVitus Won’t Let Me!


Lisa LeVitus
Photo by Bob “Dr. Mac” LeVitus


As you may recall, I released my first self-published e-book, Working Smarter for Mac Users back in February and was touched to receive many reviews like these:


Click to Enlarge


Then, a few months later, I released my first online course, Working Smarter for Mac Users—Improve your Efficiency, which is based on the first section of the book—Improve Your Efficiency—and was even more touched to receive reviews like these:  


Click to Enlarge


But… as good as I think the Working Smarter for Mac Users—Improve Your Efficiency course is, it's only Part I of a three-part solution.

Click to enlarge…

Here's What Happened

I didn't plan to release Working Smarter for Mac Users—Improve Your Efficiency as a standalone course.

In my mind, the course was always going to  cover all three parts of the book.

  • Improve Your Efficiency (green in the Table of Contents on the right)
  • Plan Your Activities (red in the Table of Contents on the right)
  • Banish Procrastination (red in the Table of Contents on the right)

But when I finished shooting and editing Part I, I was so thrilled with the way it was coming out that I couldn't wait. Against my better judgement, I released only part of the solution. Even though I said very clearly in the Prelude to Working Smarter for Mac Users (the eBook):

It may help to think of Working Smarter as a three-legged stool: If you remove one leg, it’s not a stool anymore, it’s just firewood. 

If you want to truly supercharge your productivity and take it to the next level, you’re going to have to consider improving your performance for all three legs. You may need more work on one than the others, but until you’ve integrated techniques that improve your performance in all three areas, you can’t become hyper-productive. 
— Bob “Dr. Mac” LeVitus

So, now I feel bad for offering only part of the solution... But the toothpaste is out of the tube—more than a hundred and fifty Mac users have enrolled in the course already. And, for what it's worth, nobody has complained yet. 

So I Turned Lemons Into Lemonade

But I feel bad. And I wanted to come clean with y'all. And last but not least, I wanted to turn lemons into lemonade. So, I was going to turn my misstep into a marketing opportunity by giving the course away for free until the rest of the course is ready in early 2018. 

But when I told my wife of 34 years (and my only business partner), she blew a gasket. She said, "After all the work you put into that course, you can't depreciate its value by giving it away for free!" 

I argued that giving it away would introduce hundreds, or even thousands of new Mac users to Working Smarter, and that if they liked Part I, they'd be likely to buy Parts II and III when they're done.

She countered that would be like burning up hundreds or even thousands of dollars for no good reason. 

I know the secret to a happy life is having a happy wife, so I asked her what I should do and she said, "Don't give it away, just sell it at a big enough discount to attract hundreds or thousands of users. That way everyone wins."

That Way Everyone Wins…

She's damn smart, my wife. So that's just what I'm going to do. From now until Parts II and III of the course are finished, I'm reducing the price by 80%, meaning you can enroll for just $19.99 and save a whopping $80.

But wait—there's more! By taking the Working Smarter for Mac Users—Improve Your Efficiency course now you'll be among the first to know when Parts II and III become available and I guarantee you the lowest price I'll offer to anyone, ever. All you have to do is enroll in Part I before January 1, 2018.  

Just don't wait too long. This offer will expire as soon as I finish Parts II and III or on January 1, 2018, whichever comes first. After that the price will be at least $99 for each of the three modules.   

There is one last thing:

Please use the Share button below to Share this deal with your friends and family. My wife and I thank you very much!

2 Comments

Comment

Working Smarter for Mac Users: Improve Your Efficiency — The Origin Story


After 16+ Years of Nearly Continuous Development, My New Online Course — Working Smarter for Mac Users: Improve Your Efficiency — is Now Open for Enrollment!

After more than 16 years of nearly continuous development, I'm proud to announce that my first video training course — Working Smarter for Mac Users: Improve Your Efficiency — is now open for enrollment.  

It would be an understatement to say I'm proud of Working Smarter for Mac Users: Improve Your Efficiency. I’m more than proud — I’m ecstatic. And, I'm tickled that more than 150 Mac users have already enrolled!  

This has been a dream of mine for over a decade and I'm just getting started! Working Smarter for Mac Users: Improve Your Efficiency is merely the first in a series of video training courses; I expect to have three or four more available next year.  

This new venture got me thinking about when, exactly, I was first bitten by the video teaching bug... So, I've been poring through my archives to determine the very first time I wrote about teaching via video and I'm pretty sure I've discovered the oldest known artifact:

So, here is the story of how it all began way back in 2001…

Working Smarter for Mac Users: Improve Your Efficiency — The Origin Story

The NBT ("Next Big Thing") Recording Company never came to be, and all that remains of that proposal today is the cover page and a low-resolution QuickTime demo.

I'd love to share that demo with you, but I was consumed with such incredible hubris in 2001 that I used Survivor's, "Eye of the Tiger" as background music.

What can I say? I was dead certain that Bob-O-Vision was going to be “the next big thing,” and our millions of dollars of VC funding would let me license any music I cared to.

Boy, was I wrong.

I sent the proposal and demo to every vulture capitalist I could find, as well as book publishers, CD and DVD-ROM publishers, movie studios, television networks, and everyone else I thought might, "get it.” 

But, nobody got it. 

The demo infringes on Survivor's rights and the silent version sucks eggs. So, here's the next best thing—a series of screen shots from the Bob-O-Vision demo circa 2001 (click to enlarge):


It took another 16 years for me to get it right, but I think I did. Check out Working Smarter for Mac Users: Improve Your Efficiency and see for yourself.

Or, sign up for my new mailing list and get free training guaranteed to save you precious time every time you use your Mac:

Comment

1 Comment

DON'T BUY the softcover version of Working Smarter for Mac Users... A short film by Bob “Dr. Mac” LeVitus

I hope you enjoy this short film by yours truly (Bob “Dr. Mac” LeVitus)... It explains why you SHOULD NOT BUY the softcover version of my latest book, Working Smarter for Mac Users, and why the eBook version is so much better.

This commercial shows you why you SHOULD DEFINITELY NOT buy the softcover version of Working Smarter for Mac Users (unless you really, really want to). Spoiler alert: Stay until the very end (like a Marvel Studios movie) and you'll receive a bonus -- a code for 25% off Working Smarter for Mac Users (the eBook)...

1 Comment

One Size DOES NOT Fit All!

1 Comment

One Size DOES NOT Fit All!

My editor Bryan Chaffin says one of the best (and most unique) things about Working Smarter for Mac Users is that I don't try to convince you there's only one way to do things, or that my way is the best or only way. Rather, one of the hallmarks of my eBook is that I offer you tips, hints, and techniques that have worked for me, as well as tips, hints, and techniques that may not have worked for me but may very well work for you. 

One of the things I hated about the myriad productivity and time management books I've read (not to mention the workshops, seminars, and courses I've attended) is that they're so rigid about the right way to do things.

“This is what you must do. Now, here's how to do it the right way,”

In other words, they make you believe their way is the one and only right way. 

Working Smarter for Mac Users, on the other hand, is chock full of tips like the one below, a tip Bryan felt was so important he urged me to typeset it in both bold and italic: "That’s what works for me. If you prefer all-digital, all-analog, or any combination of the two, that’s excellent. The important part is that you make a plan, and then use it."

In this case I was talking about my SuperPlan Daily Productivity Planning Worksheet, which you can download for free, so please do. I must say it's one of the most powerful tools I know of for keeping me on track and avoiding procrastination.

Now, the reason I mentioned it here is that I posted a note in social media recommending an article by Brian Tracy about setting priorities using the ABCDE method: .

Brian Tracy's method is similar to my SuperPlan worksheet but different. Where I define up to three "Most Important Tasks" each day and make them my priority, Tracy's method asks you rate all of your tasks with an ABCD or E and then use those ratings to sort them accordingly.  

I tried it, and while I still prefer my method of storing and managing all of my tasks in Reminders and Calendar and then hand writing my daily plan, (on a SuperPlan worksheet, of course) every morning,

That being said, I definitely understand that the ABCDE Method might be valuable to others. So, I recommended this article everywhere I could think of.  

The best part is reflected in this series of comments on my Facebook post. 

This is exactly what (I think) my editor Bryan is talking about... And precisely the kind of thinking I want Working Smarter for Mac Users to foster. 

Please help continue the conversation by posting your favorite tips and tricks for getting more work done in less time in the comments section below. (And don't forget to check out the free SuperPlan Daily Productivity Planning Worksheet here.)

Thanks!

1 Comment

Working Smarter with Windows on your Mac

Comment

Working Smarter with Windows on your Mac

We’ll begin with a bit of advice on working with and managing windows, including how to quickly hide and show them, the four ways you can view Finder windows, and how to tweak the Toolbar and Sidebar to make them more useful.

I work with a dozen or more apps running at any time, and most of them have more than one open window or tab. So, at any moment there are at least a dozen windows on my two displays. I learned a long time ago that a big part of staying focused is eliminating distractions—managing windows efficiently makes it a lot easier. And the easiest way to eliminate everything except what you’re working on is to hide everything except what you’re working on.

There are a couple of ways you can do it. My favorites are the Hide and Hide Others commands in the Application menu (the one bearing the app’s name).

Hide and Hide Others are a pair of my favorite commands, and, not coincidentally, a pair of my favorite keyboard shortcuts.

I use the Hide Others command dozens of times a day to banish anything and everything that might distract me from the task at hand. This hides everything but the app I’m using (Microsoft Word in the figure above) and makes it a lot easier to stay focused. Then, when I’m done using whichever app I’m using, I Hide that app’s windows before I switch to another app.

Of course I don’t use the menus—I only Hide and Show windows via keyboard shortcut, and so should you.

So memorize the shortcuts for both commands immediately:

  • Hide: Command + H
  • Hide Others: Command + Option + H

Got ‘em memorized yet? I can wait.

OK. Now, in case you forget them, here’s another way to use Hide and Hide Others without reaching for the Application menu.

  • Hide: Hold down the Option key when you click a window from another app, a Dock icon, or the Desktop. The windows from the application you’re using hide and the windows from the app you Option-clicked become active.
  • Hide Others: Hold Down the Command + Option keys when you click the Dock icon of an app to activate it and hide all other apps.

I usually use these shortcuts when I’ve got one hand on the mouse and one hand on the keyboard.

So give Hide and Hide Others a try if they're not already part of your workflow. 

Comment

Keyboard Shortcuts are Faster than Mice or Trackpads

Comment

Keyboard Shortcuts are Faster than Mice or Trackpads

Here is another skill I recommended in the first chapter of Dr. Macintosh (1989) and still recommend to this day. That skill is reducing your dependence on the mouse. Many of the things you do with your mouse can be done faster and easier with a keyboard shortcut.

If you’re not familiar with keyboard shortcuts, look in just about any menu in almost any application and you’ll see some. Take the Finder’s Edit menu, for example:

Memorize the shortcuts for Cut, Copy, Paste, and Select All to improve your productivity big-time.

I can’t remember the last time I opened this menu to use any of its commands. They’re so important and I use them so often, their keyboard shortcuts are embedded in my muscle memory. It would behoove you to memorize them all (or at least the four in the middle: Cut, Copy, Paste, and Select All).

Here’s another useful example: Instead of selecting the Icon, List, Column or Cover Flow view from the View menu, try using their keyboard shortcuts instead:

Memorize the first three commands in the View menu and use them often.

  • Command+1 to switch to Icon view
  • Command+2 for List view
  • Command+3 for Column view
  • Command+4 for Cover Flow view.

See! Isn’t that faster than taking your hand off the keyboard, grabbing the mouse, moving the cursor to the View menu, and then clicking an item?

I used that menu as an example for a reason: You want to memorize those commands or at least the first three (unless you’re among the handful who find Cover Flow view useful).

In any case, switching views quickly make it easier to work in the Finder. For example, if I am browsing a folder with a lot of pictures in List view (background window below), I just press Command+1 to switch to Icon view so I can see thumbnails of the images (foreground window below).

Switching Finder views with a keyboard shortcut is handy, but it’s merely one of the thousands of shortcuts available in the Finder and almost every Mac app that can save you oodles of time every day.

These are the symbols you'll see next to keyboard shortcuts in your menus.

Whenever you find yourself using a menu item more than a few times a day, look for a keyboard shortcut on its right. These are the four symbols you might see next to a letter, number, or punctuation mark in a menu:

So, look for these shortcut symbols in menus, and memorize the ones you use most. Trust me, keyboard shortcuts are faster every time; you’ll save many minutes every day not reaching for the mouse/ trackpad or moving it up to a menu item, which slows you down more than you think.

I created a two-page PDF you can use to memorize some of the more useful shortcuts; you can download it here. Now, tape both pages to your monitor, and then don’t remove them until your fingers automatically perform these shortcuts every time and you never think about reaching for the mouse.

I know it might seem weird that I’m telling you to print it, but that way you won’t need a mouse to find it. Plus, if you only keep it as a file on your hard drive you’ll surely forget about it.

Comment

Keyboard Shortcuts Save You Time

Comment

Keyboard Shortcuts Save You Time

NOTE: The article below was featured in my Working Smarter for Mac Users newsletter this week and is excerpted from my soon-to-be-released eBook, Working Smarter for Mac Users. It's a delightful little ditty with a tip that can save you countless hours. '

Better still, the more you use this tip, the more time you'll save. And, as you'll see, it couldn't be easier.

And, last but not least, if you read all the way to the end, there's a free gift for you!   

All this and more, but first, this brief message from our sponsor, my my soon-to-be-released eBook, Working Smarter for Mac Users:


Preorder Working Smarter for Mac Users before it ships on March 3 and save up to $20

March 3 is just around the corner and this is probably the last post I'll write before Working Smarter for Mac Users ships on March 3 and the price goes up. So, if you want to save a few bucks, please click the big blue button and pre-order your copy before March 3, OK?

Thanks. 

We return now to our regularly scheduled programming…


Keyboard Shortcuts Save You Time

Moving right along... let's take a look at another tip from Working Smarter for Mac Users... In a previous post I talked about improving your typing skills; in this post we'll look at keyboard shortcuts—which are another skill I recommended in the first chapter of Dr. Macintosh (1989) and still recommend to this day.

Using keyboard shortcuts is all about reducing your dependence on the mouse. Many of the things you do with your mouse can be done faster and easier using a keyboard shortcut.

If you’re not familiar with keyboard shortcuts, look in just about any menu in almost any application and you’ll see some. Take the Finder’s Edit menu, for example:

I can’t remember the last time I opened this menu to use any of its commands. They’re so important and I use them so often, their keyboard shortcuts are embedded in my muscle memory. It would behoove you to memorize them all (or at least the four in the middle: Cut, Copy, Paste, and Select All).

Here’s another useful example: Instead of selecting the Icon, List, Column or Cover Flow view from the View menu, try using their keyboard shortcuts instead:

  • Command+1 to switch to Icon view
  • Command+2 for List view
  • Command+3 for Column view
  • Command+4 for Cover Flow view.

See! Isn’t that faster than taking your hand off the keyboard, grabbing the mouse, moving the cursor to the View menu, and then clicking an item?

I used that menu as an example for a reason: You want to memorize those commands or at least the first three (unless you’re among the handful who find Cover Flow view useful).

In any event, switching views quickly make it easier to work in the Finder. For example, if I am browsing a folder with a lot of pictures in List view (background window in image below), I just press Command+1 to switch to Icon view so I can see thumbnails of the images (foreground window in image below).  

Click to enlarge.

Click to enlarge.

Switching Finder views with a keyboard shortcut is handy, but it’s merely one of the thousands of shortcuts available in the Finder and almost every Mac app that can save you oodles of time every day.

Whenever you find yourself using a menu item more than a few times a day, look for a keyboard shortcut on its right. These are the four symbols you might see next to a letter, number, or punctuation mark in a menu: 

So, look for these shortcut symbols in menus, and memorize the ones you use most.

Trust me, keyboard shortcuts are faster every time; you’ll save many minutes every day not reaching for the mouse/trackpad or moving it up to a menu item, which slows you down more than you think.  

Your Free Gift:

I created a PDF you can use to memorize some of the more useful shortcuts; download 'em, tape ‘em to your monitor, and then don’t remove them until your fingers automatically perform these shortcuts every time and you never think about reaching for the mouse.

I know it might seem weird that I’m telling you to print it and hang it where you can see it, but that way you won’t need a mouse to find it quickly. Plus, if you only have it as a file on your hard drive, you’ll surely forget about it.


Two more things:

If you have comments or questions, I hope you'll leave them in the Comments section below; I try to respond within 24 hours (and usually a lot sooner than that).

Last but not least, I have a big favor to ask of you: If this post (or any of my posts/books/columns/etc.) has helped you become more productive or use your Mac better, faster, or more elegantly, please use the Share button to help me spread the word. As a small (read: tiny), first-time self-publisher, I will be eternally grateful for your help spreading the word.

Thanks again for your support.   🤓  

Comment

Comment

Drive Failure Rates + Productivity Tips (from Working Smarter for Mac Users)

Hello blog-readers! This entry starts with a short tip on drive failure rates that could be useful the next time you buy a hard drive. That's followed by an excerpt from my new eBook, Working Smarter for Mac Users, an excerpt virtually guaranteed to make you more productive.   

Onward!

Drive Failure Rates

Backblaze is a cool company that releases information like this regularly.

I don't know how many people use Backblaze for their offsite backups, but it's probably a lot (and it includes me).

What I do know is that they had 73,653 hard drives spinning in 2016, and I know the brand, capacity, and hours in service for each of those drives. I also know the most important statistic of all—the failure rate for every model.  

How do I know all this? Backblaze is a cool company; they keep track of such things and share them with the public regularly. The latest update—Backblaze Hard Drive Stats for 2016—included this handy little reference chart...

...which I clipped and saved to refer to it before I buy another hard disk. You might want to do the same before your next disk purchase... 🤑  

I'm just sayin'... 

Moving right along, here's a little excerpt from Working Smarter for Mac Users with a tip that will almost certainly make you more productive than you are at the moment.  

Your Keyboard Holds the Key*

A Smith-Corona similar to the one I used when I learned how to type...

It was the summer of ’84, and there I was: A 29-year-old writer who didn’t know how to type. But I knew I was going to order a Mac when the new model (Mac Plus) came out, and I didn’t want to embarrass myself by acquiring this magnificent machine and then hunting-and-pecking it to death.

I borrowed my wife’s old Smith Corona portable electric typewriter (like the one shown here) and bought a typing instruction book at my local bookstore. Remember, there was no Internet back then, ergo, no Amazon.com or other modern niceties.

The book was boring and consisted of nothing but drills and timed tests, but I stuck with it for a few weeks, a few minutes a day, and before long I was a touch typist. And not long after that I clocked myself at around 65 words a minute, which was good enough for me. I didn’t think much about it until I started working on my first book, Dr. Macintosh: Tips, Techniques, and Advice for Mastering your Mac that it bubbled back into my consciousness.

If you’re not typing at least 40 words per minute, you’re wasting time.
Possibly the easiest way to get more done in less time is to become a better typist.
— Bob “Dr. Mac” LeVitus

Why? Well, one of the very first tips in the book was “learn to type,” and my editor didn’t think much of it. I argued that many (if not most) Mac users type using the hunt and peck method—at least way back then—and that this was one of the best pieces of advice I could offer my readers. I won the argument; here’s what appeared on page 21 of my first book:

This was good advice in 1989... and it's still good advice today!

 “If you’re not typing at least 40 words per minute, you’re wasting time. Possibly the easiest way to get more done in less time is to become a better typist.”

I wrote those words in 1989, but they’re as true today as they were back then. I hadn’t taken a typing test since that time, but because I’d never ask you to do anything I wouldn’t do, gentle reader… I just took an online typing test and it said I type 54 words per minute, which isn’t bad considering I haven’t practiced typing (other than my everyday writing) for at least 25 years.

My score; not bad for my first typing test in over a decade. :-)  

Now it’s your turn: Point your browser at www.typingtest.com and take the test right on the front page. It’s painless and will take you 5 minutes or less (I’m impatient, so I took the 1-minute version).

Here’s some bad news: Those of you who don’t type at least 40 words per minute need to learn how to type faster. It’s among the easiest ways you can improve your productivity, so for heaven’s sake—just do it! So much of what you do on your Mac requires keyboard input; typing faster will speed up almost everything you do.

And it’s so much easier to improve your keyboarding skills today than when I did it years ago on that old Smith Corona. Consider yourselves lucky: You don’t have to go to a bookstore, buy a book (or anything else), or even leave your home or office.

Improve Your Typing for Free

Click "Train for Free" to learn to type faster. For free. 

Go back to www.typingtest.com, but instead of taking the typing test, click the big green Train for Free button.

You’ll probably get the best results if you choose the 21 free lessons, which are sure to increase your typing speed a lot. The site promises to double your speed, but I wonder if that’s true; please do me a favor and drop me a note if you try it—I’d love to know if it doubled your speed.

If you don't like lessons, try a typing game like this one. 

Or, if you’re not prepared to commit to 21 lessons—even though you should if you can’t type at least 40 w.p.m.—try the Typing Games instead. I like the Typing Attack game, which uses a Space Invaders metaphor with words dropping from the sky for you to shoot by typing the word before it crashes into the ground or your letter-firing cannon.

The point I’m making is that if you aren’t typing at least 40–50 words per minute, you could easily speed up almost everything you do by improving your keyboard skills. Imagine finishing everything you do 10, 20, even 30% faster, which is entirely possible if you just improve your typing skills.

If you feel you’re already a pretty good typist (say 50 w.p.m. or more), consider this: If you spend a little time each day for a week working on drills and/or games at www.typingtest.com, you could be typing 80 or more words per minute! Think of all the time you’ll save. 

OK. I think I’ve made my point about typing...

Comment

2 Comments

I Wanna Give You Free Stuff!

As a first-time self-publisher, I've been reading a lot about building an email list and attracting new fans. And it turns out one of the big trends in marketing on the Internet today is to give away up to 95% of your content. 

I'm not sure how true it is, but I'm ready to give it a. try. All you have to do is sign up for my newsletter and I'll give you not just one, not just two, but THREE INCREDIBLY USEFUL FREEBIES: 

Keyboard Shortcut Cheat Sheet for macOS

Keyboard Shortcut Cheat Sheet

Two pages of keyboard shortcuts for macOS. Try 'em; learn 'em; then commit 'em to muscle memory!

SuperPlan Productivity Planning Worksheet

SuperPlan Productivity Planning Worksheet

One of the best ways to be more productive is to have a plan for each workday. This is how I plan mine!


and

Quotable Quotes

Quotable Quotes

Memorable mutterings from the famous and infamous -- all aimed at inspiring your productivity!


So? What are you waiting for? Sign up now and claim your free gifts!

2 Comments

Comment

Book Update + a Toolbar Tip

I'm so happy to have finished Working Smarter for Mac Users. All of the chapters are in production and the final iBook, Kindle, Nook, PDF, and print-to-order versions should be available by the end of February assuming no major hiccups.

Now, I've got some very good news for you: You don't have to buy my book. I know it sounds crazy but I want everyone to see it so I'm going to give away all or most of it right here in the coming months. Just keep coming back (or sign up for my free newsletter) and you'll see all (or at least most of) the book's contents right here. It may take a year or more but I'm not going to hold back—all the good parts will appear here for free. Eventually.  

Of course, if you can't stand the suspense and don't want to wait you can pre-order your copy now so you'll be among the first on your block to own it. In the meantime, I've posted the book's frontal matter—the Table of ContentsIntroduction, and Prelude— for your reading enjoyment and edification, so please enjoy them at your convenience!

There is one more thing: This site is supposed to be all about the tips, so here's a good one from Chapter 2 (of Working Smarter for Mac Users):


Getting More Out of Your Toolbar

You probably know you can choose View-->Customize Toolbar to add or remove items from the Toolbar:

What you probably don’t know is that you can also add any folder or file to your Toolbar by holding down the Command key when you drag the item onto the Toolbar. In the figure above, I’ve added the Dropbox and Work folders to my Toolbar, making it easy for me to drag files or folders onto them or open them with a click. 

The Command key is also the key to other useful Toolbar tricks. For one, you can rearrange the items on the toolbar while the Customize Toolbar overlay is open, but it’s often faster to press the Command key and rearrange your Toolbar icons without bothering with the Customize Toolbar overlay.

The Command key is also the key to removing items without first invoking the Customize Toolbar overlay. To get rid of an item, press the Command key and drag it off the Toolbar; when you release the mouse button the item will disappear with a satisfying “poof.” 

Here’s one final Toolbar tip before we move on: If you often forget what your Toolbar icons mean, choose Icon and Text from the pop-up Show menu in the lower left corner of the Customize Toolbar overlay. This will display the item’s name below its icon, as shown on the left below:

Or, hover the pointer over any item in the Toolbar for a few seconds and its description appears as a tool tip (Perform tasks with the selected items in the figure below).

One last thing: If you try to drag a file or folder to the Toolbar and it won’t stick, chances are you’re trying to drag an alias. You can’t do that. Instead, find the original file by clicking on the alias and choosing File-->Show Original or Command + R, and then dragging the original file onto the Toolbar.


P. S. If you like this stuff, please tell your friends. As a tiny independent publisher I'll be ever so grateful. Thanks again for your support. 🤓   

P. P. S. Comments, feedback, requests, and such are always appreciated... Leave them in the comments section here or email me at: bob@workingsmarterformacusers.com

Comment

Save Up to $20 When You Pre-Order Working Smarter for Mac Users

Comment

Save Up to $20 When You Pre-Order Working Smarter for Mac Users

Pre-Order Working Smarter for Mac Users Today and Save Up to $20

Cover art: Scott Thomsen/Agave Design

I'm thrilled to announce that I've finished the writing portion of Working Smarter for Mac Users. All I've got left is a final edit and production. So, if all goes well it, should be available in the iBook Store, Amazon.com (Kindle Store), and elsewhere by the end of February.

In celebration (I don't know about you, but I'm celebrating!), I've got a special deal for you:

From now until the day it ships, you can pre-order your copy and save up to $20. 

Click here to view the Table of Contents, sample chapters, and additional information (or to order your copy of Working Smarter for Mac Users).

Comment

Comment

Need Help? I've (Finally) Got The Time!

Bob “Dr. Mac” LeVitus

I am now accepting a limited number of new consulting clients...

If you need help with your backup strategy or execution (or anything else on your Mac or iDevice), I'm happy to say I'm once again accepting new consulting clients.

I'm pretty stoked because several of you have asked about it and I've had to turn you down. But, now that I've finished writing Working Smarter for Mac Users (in production; watch for it this March in fine eBook Stores everywhere) I have the time and bandwidth for a few good clients...

Here are just a few ways I may be able to assist you:

  • Productivity audit:  Are you as effective and efficient as you could be? If not, I will observe your working style and show you how to do whatever you're doing better, faster, and more elegantly, so you'll have more time for things you love.   

  • Troubleshooting Mac, iPhone, or iPad issues: I'm one of the best Mac and iOS troubleshooters I know. Really. If I can't figure out what's wrong with your Mac or iDevice and fix it (or determine it is a hardware failure), you'll pay nothing. It's that simple.

  • Hardware or software recommendations: Tell me exactly what you're hoping to accomplish and I'll do the research and recommend the best tools and workflows based on your needs and budget.  

  • Software or task-based training: I'm proficient using dozens of apps including but not limited to: Photos, iTunes, Pages, Keynote, GarageBand, iMovie, Photoshop, Microsoft Office (all versions), and Final Cut Pro. I can teach you how to perform almost any task faster and more easily if you depend upon these (or many other) apps. 

  • Backup strategy development and deployment: I can help you devise the right backup strategy based on your needs and budget. If you like, I can even set your system up, configure and test it, and provide written instructions for testing and restoring.   

So if you need help with something—Mac or iOS—click here for details or to request an estimate.

Comment

Why You Must Test Your Backups...

Comment

Why You Must Test Your Backups...

I began 2017 with a pair of columns reminding users that their hard drives are going to fail—absolutely and positively—and that the question isn't if they're going to fail, it's when they're going to fail. And, I urged them to back up their data or risk losing it forever. If you haven't seen the columns already, you really should; you can  find them here:  

Resolve to Back Up Your Mac in 2017 (Dec 28, 2016 ) & Backups on a Budget (Jan 04, 2017).

Go ahead; I'll wait...

And now, here's the thrilling conclusion (at least for now): 

My Time Capsule is Headed for the Trash Heap!

I started getting this error message occasionally a few  years ago... But I saw it frequently enough last year that I reformatted my Time Capsule drive and started from scratch, hoping that would fix things. 

Time Capsule f%#$ks me yet again...

It did not. Last week I saw this disappointing error message for the third and final time since reformatting... Now, I've lost my trust in the Time Capsule and its hard drive so it's headed to the scrap heap RealSoonNow™.

As you may recall, one of the things I stressed in those two columns was that you absolutely, positively must test your backups by occasionally restoring some or all of their files. Remember:  A backup you can't restore from isn't a backup at all.  

Frankly, this was no big deal to me—my other nickname is Dr. Redundant. That Time Capsule backup disk was one of three local backups I maintain, along with a cloud-based backup (using Backblaze), and two sets of clones (I use Carbon Copy Cloner and ChronoSync): one stored locally; the second stored at my bank in a safe deposit box.

The point is, had the Time Capsule been the only backup I had, I'd have no backup at all today!

So make a backup plan and test it relentlessly. Just do it. Please.

Comment

A Pair of Inexpensive, Productivity-Enhancing Apps (for your Mac)

2 Comments

A Pair of Inexpensive, Productivity-Enhancing Apps (for your Mac)

I’ve always been obsessed with finding the fastest, easiest, or most elegant way of doing something, so many of my favorite Mac (and iOS) apps are simple, inexpensive utilities that help me do one thing better, faster, or more elegantly. I added a dynamic duo of such utilities to my Mac productivity arsenal earlier this year; today I wouldn’t want to use my Mac without them.   

MOOM = MOVE AND ZOOM WINDOWS MOUSELESSLY

Moom is a $9.99 app that manages windows on your Mac. I mostly use it to memorize the on-screen placement of windows from multiple apps so I can instantly restore my favorite screen layouts with a single keystroke. I used to spend time every day rearranging the windows on my screen until they were just so. Today, after I get the windows on my screen(s) to be “just so,” I ask Moom to memorize the layout so I can recall it whenever I like with a single keystroke.

I have a 27-inch display connected to my MacBook Pro that I use as my main monitor, using the MBP's built-in 15-inch Retina display as a second display. I like to keep three windows open on that screen at all times—Activity Monitor, iTunes, and ZoneBox (my pomodoro timer/manager), and I like to see them in the same location on the smaller screen at all times. Sadly, no version of macOS so far has managed to convince windows to open in the same place on the same screen every time. Left to its own devices, macOS usually opened those windows somewhere on the larger screen.

The three windows move to a different location of their own volition almost every day after I quit or crash one of the three apps,  change screen resolutions, or restart or log out of my account. Moom lets me save a custom window arrangement and recall it with a keyboard shortcut (Control+0), which instantly resizes all three windows (if necessary) and rearranges them just the way I like them on my smaller screen: 

I press Control+0 and the windows on the smaller screen are instantly arranged exactly the way I like them!

I have two displays, so another feature I use all the time relocates the active window from one display to the other with a keystroke (Control + 5). In the blink of an eye, the active window jumps from one screen to the other. Then, if I press Control+5 again, it will jump back to its original location.

I also have shortcuts that instantly move the active window to one of the screen's corners (Control + 1, 3, 7, and 9).

Just some of my Moom keyboard shortcuts.

I also love being able to move and resize windows without touching the mouse (keyboard shortcut Control+`), yet another of Moom’s many excellent tricks.

When I press Control + `, I can move or resize the active window from the keyboard, without touching the mouse! 

One satisfied user calls Moom the, “Best. App. Ever.” I’m not sure I’d go quite that far, but for ten bucks I consider it a bargain, and one that saves me time and effort almost every day.

MenuMate=Your Menu Bar Wherever You Click! 

MenuMate is a $4.99 Mac app that puts the menu bar for the active app right under your cursor, wherever it may be on the screen.

I believe keyboard shortcuts are far faster than reaching for the mouse and moving the cursor up to a menu. And, since many menu items don’t come with keyboard shortcuts, and there are many apps I don’t use often enough to know their keyboard, I find MenuMate indispensable in both situations. Once installed, it hangs out in the background waiting for you to summon it. When you do, via either a keyboard shortcut or programmable mouse button, the menu bar appears wherever you click.

 When I invoke MenuMate while using iTunes, its entire menu bar appears beneath the cursor.   

I mostly use mouse button #3 on my Logitech MX Master mouse —the one under the scroll wheel—to invoke MenuMate, and I find it incredibly handy. Having every item in every menu available wherever I click is an awesome thing.

More Info:

Moom by ManyTricks. $9.99. ManyTricks web site  •  Mac App Store

MenuMate by ZipZapMac. $4.99. ZipZapMac web site  •  Mac App Store

2 Comments

Comment

Gifts for the Geeks you Love 2016

It's traditional that I write at least two gift guide columns toward the end of each year and this year was no exception. In fact, this year I recommended more cool products in my three gift columns than ever before. Rather than sending you all over the Internet to read them, I've summarized or pasted all of the salient details (and more—including pictures!) below.

So, without further ado, here are this year's picks for the best gifts to get for the geeks you love:

Kenu Stance: A Tiny Tripod for iPhones

One of the best ways to insure great-looking pictures is to keep your camera still. So, my first suggestion this year is Kenu Stance ($24.95), an ingenious tiny tripod that connects to your iPhone’s Lightning port using MicroMount, a patent–pending attachment made of a durable, resilient resin known as Grilamid. That doohickey connects to a ball-and-socket mechanism, allowing precise positioning of your iPhone in both portrait or landscape modes.

Despite being smaller than a pack of gum and weighing about as much, the rest of the device is fabricated of heavy-duty zinc alloy, making it solid as a rock. Finally, one of its legs doubles as a bottle opener. Bottom line: It’s earned a permanent spot on my keychain so I’m never without it.

Link: Kenu Stance for $24.95 at Amazon.com

Grado SR60e: Killer Headphones at a reasonable Price

I bought my first (and so far, my only) pair of Grado headphones more than 20 years ago. I never expected them to last this long, and I never expected them to still be among my favorite headphones of all time, but they are. Handmade in Brooklyn, N. Y. since 1953, Grado still makes some of the most amazing sounding headphones you’re likely to encounter.

Now for the good news: While they no longer make my beloved SR60 model, its successor (SR60e), which sounds as good or better, still sells for under $100.00.  

Link: Grado SR60e for $79.00 at Amazon.com

BLUE RASPBERRY + YETI: Awesome yet affordable microphones

As much as I love the Blue Yeti USB microphone ($122.09) I use for podcasts, voiceovers, and GarageBand and Logic Pro recordings, it’s a little too bulky for travel. So, for years I’ve been on the lookout for a portable mic that sounded as good as the Yeti.

I found it in the new Blue Raspberry mic ($199.00). With its new, patent-pending Internal Acoustic Diffuser (IAD) to minimize environmental sounds on your recording; an integrated stand with a connection insulator and shock absorbing feet; and both USB and Lightning cables in the box, it’s the best sounding microphone I’ve ever used on the road.  

Link: Blue Raspberry USB mic for $199.00 at Amazon.com
Link: Blue Yeti USB mic for $122.09 at Amazon.com

sandisk ixpand: Add storage to iDevices

Next, if your geek’s iDevice is running out of space, SanDisk has an elegant solution—the iXpand Flash Drive. These little gems look like ordinary USB flash drives, but have a flexible Lightning connector at the end opposite the USB 3 connector. The free iXpand mobile app lets you back up your iDevice’s Camera Roll automatically, transfer videos and photos to and from your iDevice, and watch movies in popular video formats including WMV, AVI, MKV, MP4, and MOV.

Prices start at $49.99 for 16GB to $129.99 for 128GB.   

Link: SanDisk iXpand starting at $49.99 at Amazon.com

SILK FOLIOIPHONE 7/7 Plus Case + Wallet for under $15

I’ve seen many iPhone cases that purport to replace your wallet, but most of them don’t hold enough stuff. The Folio Wallet Case for iPhone 7 and 7 Plus is the exception, with separate pockets for 4 credit cards plus a full-sized place for cash. It provides more than adequate protection; includes a screen protector and wrist strap; and folds into a stand for viewing movies.

With all that going for it, the lifetime warranty and ultra-low price of $14.99 are merely the icing on the cake. 

Link: Silk Folio iPhone Case for iPhone 7 at Amazon.com

WICKED REACH: TURN ANY HEADPHONES INTO BLUETOOTH HEADPHONES

If you know a geek who is tethered to his or her iDevice by a headphone cable, the Reach Bluetooth Audio Receiver ($24.99) will let them use their favorite wired headphones without the wires. Just pair the Reach with your iDevice, and then plug your wired headphones or earbuds into the Reach. It’s tiny—about the size of a book of matches—yet it offers a full array of controls including volume up and down, track control, an answer/hang up/play/pause button, and a built-in microphone so you can use the telephone hands-free.

For what it's worth, though it's not designed for non-bluetooth speakers, I tried it and it works pretty well for that as well. If your geek likes his or her wired headphones, this little doohickey will makes 'em wireless for under $25.     

Link to Wicked Reach for $24.99 at wickedaudio.com

Olloclip Lenses: Make a great phone/camera even Better

I’ve loved using Olloclip lenses with my iPhones for many years, so I’m pleased to report that their latest and greatest—the Core Lens Set for iPhone 7/7 Plus—may be the best set yet. For just $99.99 it includes not one, not two, but three lenses: a fisheye, a super-wide angle, and a 15X Macro—all with new and improved premium multi-element optics.

There’s also a new Connect interchangeable lens system, so it’s easier to use other lenses (not included) like a 2X telephoto.

My favorite new feature, however, is a new hinged lens base that not only keeps the lens flush with the camera for improved optical performance, but also lets you use lenses with (most) screen protectors. YEA! 

Link: Olloclip lenses starting at $79.99 at Amazon.com

USELESS MACHINE KIT (No Soldering): WHAT it sounds like... 

I’m a little ashamed to admit I want one, but I think I’d like a Useless Machine Kit (No Soldering) from Fry’s Electronics ($34.99). Once assembled, this little box has a single switch and a motorized arm that pops out, flips the switch, and then goes back inside the box. It's simple, totally useless, and (from what I hear), never gets old.

As the name implies, there’s no soldering necessary—all you need is a screwdriver for hours upon hours of useless fun.

Link: Useless Machine Kit for $34.99 at Frys.com

IPHONE FOR DUMMIES, IPAD FOR DUMMIES AND/OR
MACOS SIERRA FOR DUMMIES:
My books make fine gifts

I've released three books in the past month or two — iPhone For Dummies 10th Edition and iPad For Dummies 9th Edition (both with co-author Ed Baig), and macOS Sierra For Dummies, which is all mine. They're all pretty good books if I do say so myself. Heaven knows they've been updated enough times to get all the bugs out. They make a thoughtful gift for mom, dad, or anyone who is just getting started with their Mac, iPhone, or iPad. And, with all three priced around $25 at Amazon.com, they won't break the bank. 

Link: My books at Amazon.com

A Subscription to APPLE MUSIC: give The Gift of over 30 million songs in your pocket

Last, but certainly not least, with the holiday season in full swing, my top gift suggestion for any music-lovers in your life is a subscription to Apple Music.

Apple Music, if you haven't heard, is Apple's subscription music service with over 30 million songs for subscribers to either stream or download to their Apple devices.

Not that I care, but I'd be remiss if I didn't at least mention that it works with many non-Apple devices including Windows PCs and Android phones and tablets.

I spend a lot of quality time with Apple Music every single day, so here are four things I love most about it: 

  • First and foremost: If I can think of a song title (or part of a song title or even the artist’s name sometimes), I can usually find the song in a few seconds and be listening to it a few seconds later. I also love being able to search for music by genre and year—such as, “rock hits from 1973,” “jazz from the 1950s,” or “space-age bachelor pad music” to name a few I’ve used lately. I also like that searches often reveal curated playlists you can save for future streaming or download for offline listening.     

  • Which brings me to the second thing I love about Apple Music: Siri. I mean, sure it’s cool to search 30 million songs by genre, year, or artist, but it’s cooler to say, “Hey Siri! Play rock hits from 1973,” and make it so.

    I ask Siri to play music for me almost every day and I love this feature more every time I use it.

    By the way, on iOS devices (and macOS 10.12 Sierra), you don’t have to subscribe to Apple Music to ask Siri to play music from your iTunes library. If you’re not asking Siri to play music for you already, why not give it a try?

  • Moving right along, the third thing I love about Apple Music is the price—Student Memberships are $4.99 per month and Individual Memberships are $9.99 per month. Those are good deals but the best deal is a Family Membership, which provides the full Apple Music experience for up to six people for a mere $14.99 a month.

  • And the fourth thing I love about Apple Music… is sharing albums and playlists with other subscribers, especially my wife, and kids. Now, when I come across a song, album, or playlist one of them might enjoy, I send them a link, which they can listen to immediately and add to their music libraries if they care to.

If you prefer not to give a monthly subscriptions as a gift, why not consider an iTunes gift card, which start at just $10 and can be used for Apple Music or iTunes, iBooks, or apps for Macs or iOS devices.  

Link: Apple Music at Apple.com

One last thing: The Amazon.com links above are all "sponsored," so they generate small (micro) payments. Please use them if you don't mind. You pay the same price, and by using them you help offset the costs of running the site, newsletter, and blog. Thanks!   

Comment